Mogollon Monster 100 Mile Course Map & Aid StationS
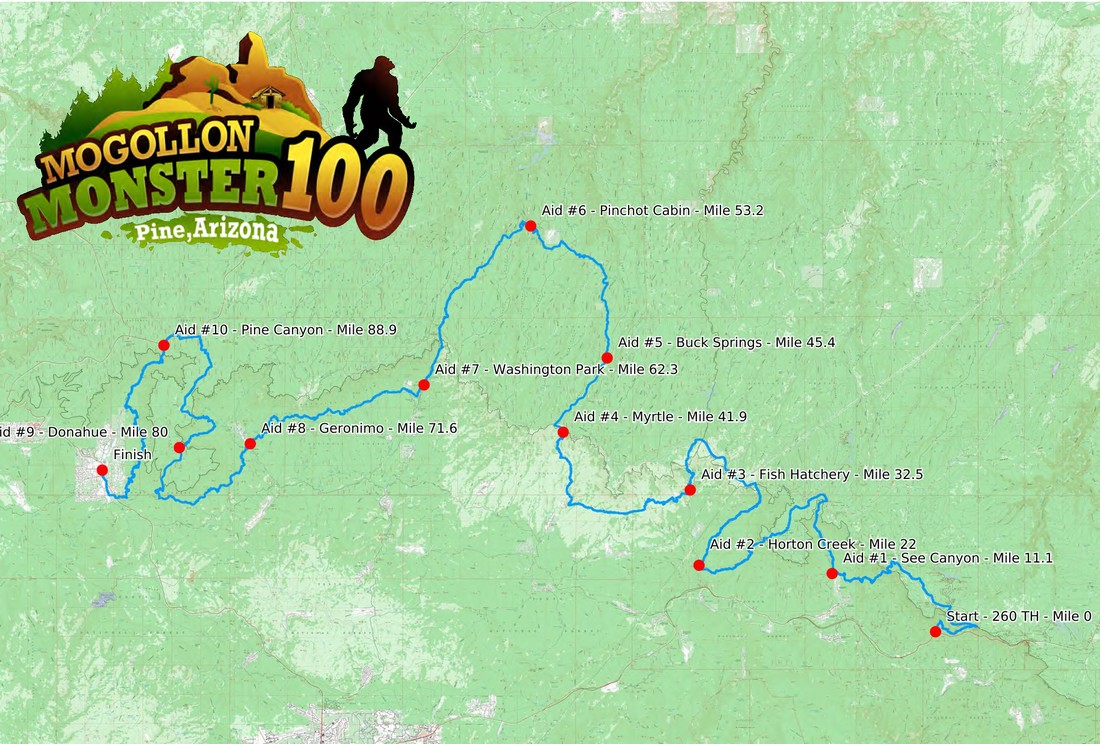
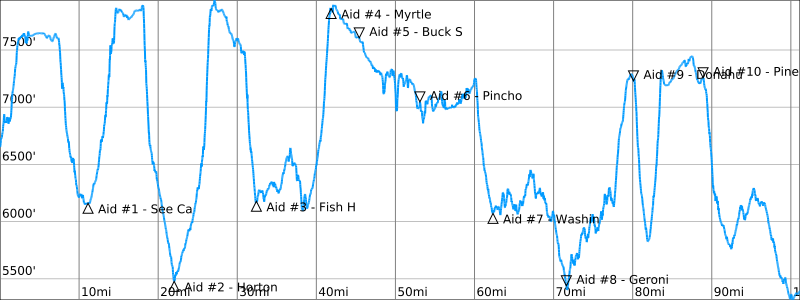
Total elevation gain is somewhere around 17500 feet of gain and approximately 18,500 feet of descent.
Important Update: Please be sure to double check your drop bags, crew access, and pacer access. We are updating everything and working on creating the best runner experience possible. With that, changes will come about.
NOTE: We mention this in our rules and info section too but you may see mileage distances off by .1 or more between the CalTopo maps, aid station guide and descriptions. You do not need to contact us about this discrepancy. You will likely encounter even larger gaps during your 100 miler. We do our best to nail down your actual distance but cannot guarantee that your course will not be long or short as advertised- but it will be close. Stay ahead of the cutoffs and run until you finish in town. Enjoy the process.
Start Time: 6 AM
CalTopo Review
Desktop: Top of the screen will have an "Export" drop down menu. Select from GPX, KML, etc. in the top left. Click Export.
Phone: On left side of screen there will be 4 icons. Click the folder with pin drop, then Export. On the top will be a drop down menu title "Format." Set it to the file type you want and then click Export. The export will load, and if you have a tracking app on your phone already (Gaia for example), it should ask to export directly to your app. Once the export is complete, you can use this during your race in airplane mode and always know where you are.
NOTE: It is important to make sure you set the file format appropriately or the file will not download as a GPX or KML.
#1. Start to See Canyon Aid Station ~ (Mile 11.1) - 11.1 Mile Segment, ~1,100 feet of Gain
This is/was the finish of the Zane Grey 50 Miler for a couple of decades. You'll begin your 100 mile journey here and immediately climb up the Mogollon Rim, gaining just over 1,000 feet in a little more than two miles. This will likely be your easiest and shortest climb to the top and the views are stunning so soak it in. You'll cross the FS 300/ Rim Road, following the historic General Crook Trail before heading down Drew Trail #291 to the See Canyon Aid Station. There is a short out and back here to reach the aid station parking lot.
#2. See Canyon Aid to Horton Creek Aid Station ~ (Mile 22) – 10.8 Mile Segment ~ 1,800 feet of Gain
Leaving the aid station, you'll head back the same way you came but continue up the Rim on See Canyon Trail, climbing some 1,700 feet as you cap out at the Rim Road once again. This time you'll essentially continue down an old forest road through the trees and quickly descend off the Rim once again, this time following the Promontory Butte Trail #278 down to the Historic Highline Trail. When you reach the butte, the initial descent off the rim is quite steep with loose ground as you make your way down and around the edge of the rim. Ironically, the Highline portion here is probably the nicest trail you'll encounter as you then continue on the Derrick Trail #33 all the way to Horton Creek Aid, completing around 4.5 miles of downhill along the way.
#3. Horton Creek to Fish Hatchery AS (Mile 32.4) - 10.6 Mile Segment ~ 2,850 feet of Gain
Leaving Horton Creek area, you'll cross over the actual creek and begin to slowly climb up the rim. After around 3 miles, you'll come to the junction where the Highline Trail crosses Horton Creek Trail and continue right for a short stretch where you'll see the creek again. Turning left, you'll come to a small waterfall where Horton Springs is. This is a beautiful area and worth taking a minute at since you'll begin a steep climb immediately after. Following the small single track up the left side of the waterfall area, you'll continue climbing on short switchbacks up to the top of the rim. This section of the course is one less traveled and the connector from the Highline to above the Springs can be difficult to see so just make sure you're keeping an eye out for the orange pin flags and our orange and black polka-dot ribbons.
You will top out around 7,900 feet, having climbed around 2,800 feet on this section. Once on top of the Rim, you'll have to follow the Rim Road for about 3 miles before turning left onto the Babe Haught Trail #143. This section of road is what we're calling the Black Mesa Crew Zone where your crews are able to see you on your way through.
Once you hit Babe Haught, you'll kind of meander through the forest before you begin to descend of the rim where you'll enjoy some incredible views looking south. You'll be able to see East along the rim as well including the Myrtle Trail where you'll be heading in the near future.
NOTE: Fish Hatchery is your first drop bag location and some (most?) of you will need to make sure you have your headlamp (and possibly even warm clothes?) as your next drop bag location is Pinchot Cabin at mile 53.
#4 Fish Hatchery to Myrtle AS (Mile 42) – 9.5 Mile Segment ~2,400 feet of Gain
By now you're probably starting to understand what we mean when we say the course beats you up. Nevertheless, you're going to now experience the Highline Trail for the next 7+ miles through thick manzanita bushes, exposed climbs, high grasses, ferns up to your chest, and rocks. Lots. of. rocks. The turnoff from the Highline to Myrtle Trail is hardly noticeable as I'm fairly certain this trail is used 2-3 times a year at most. You'll make your way up a small hill and where the Highline drops down into a tall grassy area that previous Mogollon runners cringe at the thought of, you'll head right/north up the Myrtle Trail to the top. The first part of this trail is difficult to follow, even with our trail work to try and make the trail noticeable. Once you're on the switchbacks and climbing up the Rim, you'll be treated to waist high (at least) grass covering the trail as you wind up to the top of the rim, completing your fourth rim climb in just about 40 miles.
#5 Myrtle Aid to Buck Springs AS (Mile 45.8) – 3.9 Mile Segment
Myrtle will be a smaller aid station as you'll head turn left onto the Rim Road and continue just under 1/2 mile where you'll turn right onto FS321 on your way another 3.5 miles to Buck Springs. This entire section is on forest service road and a good opportunity to get yourself together and chip away at some "easy" miles. You'll be spending the next 20+ miles on top of the rim with easier terrain (comparatively), around 7,500-8,000 in elevation, and likely into the night for most of you. Buck Springs will have crew access and your first opportunity for a pacer.
#6 - Buck Springs to Pinchot Cabin AS (Mile 53.4) – 7.6 Mile Segment
Now over 43 miles into the race, you can now pick up a pacer before heading out onto the U-Bar Trail towards Pinchot Cabin. This is known as the Cabin Loop, a series of trails in the Coconino National Forest that certainly don't scream "Arizona" but is a pretty amazing reprieve for us Phoenicians in the hot summer. You'll cruise through the forest on beautiful single track for a few miles, passing Dane Springs & an almost completely destroyed cabin, all the way to the bottom of Dane Canyon before climbing all the way back out. You'll do the same with Barbershop Canyon, and then Draw Canyon before hopping on some forest service roads for just over 1 mile as you descend to the actual Pinchot Cabin set in a little meadow. The aid station will be another 1/3 of a mile up on top of the hill.
#7 Pinchot AS to General Springs Crew Zone - NO AID (Mile 60.2) – 6.8 Mile Segment
Leaving Pinchot Cabin Aid Station you’ll cross the forest road leaving the station and almost immediately on the left is the start of the Fred Haught Trail. Pay attention here! Your left turn is almost immediately on your left, leaving the forest road for single track. The trail will take you down the trail ½ mile before hitting a forest road. This is a short stretch of road that takes you around Bear Canyon. This trail has been closed since 2017 when a flash flood destroyed the bridge on FS-95. The road is still closed but they'll finally opened the trails up and you'll be some of the first to take this route...legally. You'll be dipping down into the canyon through piles of washed up logs and back up a short, steep slope to the road. Another easily missed turnoff here...not far after hitting the road, on the left you will see the turnoff for the single track of Fred Haught again (almost a 180 turn on the single track). If you walk across a cattle guard on the road you just missed it. Turn around and you’ll see it on the right headed up the hill.
There is a short but steep climb starting out again on the Fred Haught but aside from that there are some fun sections of ups and downs throughout this stretch. Again, there are more forest roads that access this area for various reasons and you will always see the trail on the other side of the road or fire break. This section is very well marked on its own with both Cabin Loop markers on the trees, Arizona Trail markers or signs of when you’ll hit it and “blazes” in the trees. Blazes are two chunks cut out of a ponderosa tree and then burned. They were done back in the 1800’s (some more recent) and signify the trail as well. These are all secondary markers to our orange/black polka dot (correct) and white/blue checkerboard (wrong way) markers but are reassuring nonetheless. Eventually the Fred Haught Trail meets back up with the Arizona Trail and the trail meanders along a river crossing it several times with some beautiful single track mixed with ferns all along the way. This terminates at the General Springs cabin and General Springs at a dirt road. There is no aid here, but you will have crew access again and in about 1/2 a mile, you'll drop back off the Rim and be cruising the Highline Trail.
General Springs Crew Zone is a good place for another pacer and has crew access as well. Once you leave this area, you'll be below the Rim in Tonto National Forest land for the next 18 or so miles.
#8 – General Springs Crew Zone (NO AID) to Washington Park AS (Mile 62.6) – 2.4 Mile Segment
Leaving General Springs, you continue up the dirt road about 1/2 mile to the Rim Road and go straight across the road and follow the power line trail straight down the rim. The first 1/4 mile of this descent is nasty. Steep, with big loose rocks, and random little bushes and plants trying to gain a foothold in the 45 degree terrain. Take your time here and be glad you're not going up and down this stretch like in the past. Once you get through the initial sketch, the rest of the way is an easy trip to Washington Park on an old service road for the power line & newer section of winding single track right to the aid station. The actual aid requires a tiny but super important out and back to the parking lot on your left.
What had always been the hub of The Monster, with runners hitting the Washington Park aid station three different times, WP is now a quick stop right around the 100Km mark. Leaving WP, you'll spend the next 10 hardy miles on the Highland Trail so it's a good place to make sure you're ready to continue on in the last 1/3 of your race.
#9 Washington Park Aid to Geronimo AS (Mile 72.4) – 9.8 Mile Segment ~ 2,000 feet of Gain
This section is 9.8 miles long but is very challenging and with 62+ miles on your legs and body will likely take much longer as you have a good chance to hit this section in the middle of the night. The Highline consists of lots of ups and downs, without a single long, sustained climb. You can follow Arizona Trail markers, Highline Trail #31 black diamond markers and the orange / black polka dot (good) and blue/white checkerboard (bad) we put out there.
#10 Geronimo Aid to Donahue AS (Mile 80.3) – 8 Mile Segment ~ 2,200 feet of Gain
From Geronimo Aid, you'll cross the dirt road and continue West on the Highline Trail continuing around the base of the Rim for nearly 6 miles before turning right onto the Donahue Trail. This is a series of short switchbacks up the Rim with Manzanita and Cat Claw encroaching on the trail as you avoid the loose volcanic rocks in the trail. Even better, you'll likely be able to catch views of the Town of Pine on this section, just a few miles away, but you still have 20+ miles and two climbs up the Rim to conquer (you're welcome). The climb up Donahue is shorter than years ago with multiple renovations bringing the Highline Trail higher on the mountain and cutting off some of the lower switchbacks on Donahue. You'll eventually pop out on a forest road and continue straight/left on the road for about 1 mile to the aid station. In the past, Donahue marked the 100 mile mark in the Monster, immediately after completing the brutal West Webber Climb. Now, you'll be running down West Webber to the junction of Turkey Springs, turning left and then climbing immediately back up to the top of the Rim popping out at Dickerson Flat.
#11 Donahue Aid to Dickerson Flat Crew Zone (NO AID) (Mile 84.2) - 3.9 Mile Segment ~ 1,800 feet of Gain
From the aid, you'll quickly begin your steep descent off the Rim, following a series of switchbacks through tall Ponderosa pines and eventually a couple of small streams with ferns aplenty. You'll come to the end of the West Webber Trail and turn left on Turkey Springs Trail where you'll climb slowly at first, but then be treated to more of those short switchbacks surrounded by manzanita, cat claw, loose rocks and dirt as you ascend to the top of the Mogollon Rim for a sixth and final time. You're not out of the woods yet, but you can certainly hold on to a bit of pride at the top here. Turn around and soak up this view, looking across the Rim in the direction you came from so many hours before.
#12 Dickerson Flat (NO AID) to Pine Canyon Aid (Mile 89) – 4.9 Mile Segment
This is another opportunity to chip away some miles without giving too much effort, assuming you're not totally spent from those brutal 86 miles that brought you here. But either way, the road is in decent shape, tucked in the Coconino National Forest and doesn't have a ton of traffic so you can relax the mind a bit as you make your way around Pine Canyon and eventually to the edge of the Rim one more time.
#13 Pine Canyon Aid to Pine Trailhead (Mile 100) – 10.9 Mile Segment
Shortly after leaving the aid station, you'll be treated to an exceptional view south into Pine Canyon. Soak. it. up. From here, you'll descend almost 1,800 feet in 2 miles on switchbacks and back into the forest. There is a small stream on your left that may just be worth the effort of leaving the trail for a dip in at this time. There are multiple trail signs on this section, none of them matching the other but expect 10+ miles of trail and know that even after dropping 1,800 feet, you'll continue to climb now and again on your way to the trailhead. This is a gorgeous trail, winding up, down, and around the canyon as you make your way closer and closer to the Pine Trailhead which will be just about 100 miles into the race. Ever run this far? Congrats! But you're not done. Grab some water for the victory lap and keep going.
#14 Pine Trailhead (Water Only) to Finish at the Town Ramada (Mile 101 ish) - 1.6 Mile Segment
This trailhead is less than 2 miles to the finish line. Pacers are welcome here to the finish. There’s no point in spending much time here unless you're in dire need of water. It’s a parking lot. It’s 2 miles from the finish.
Leaving Pine Trailhead AS you’ll run down the paved road for the trailhead to just before the 87 highway. To cross the road you’ll drop down 15 feet to the right to a culvert access point and go UNDER the road in the tunnel. This is the safest way to get across what can be a busy road. The tunnel is free of debris and about 30ft long. On the opposite side you will be directed 100 meters to the right to Bradshaw Road. Go left down the hill to Old County Road and go right. This is all paved now and the road goes through a residential street until it meets up again with the 87 right where the Old County Inn & our Friday packet pickup were. Head left along the wide shoulder into the town of Pine. You have about ½ a mile left and it’s all through the town itself. Follow the wide shoulder inside the white line past the Pinewood Tavern, Ponderosa Market, old buildings and the finish line will be at the Community Center just after HB's Place and by the ice cream shop on Randall.
You’ll see the finish line.
I recommend a full sprint to the finish.